Following on from the first part of this tutorial found here. This will be pretty straightforward to populate the options with the updates and creates two additional screens.
Record Options Decision
Create a decision that will take the option selected in the previous screen and run through the required actions. So the decisions are Edit Record, Create Record, and End Flow. You will set the decision criteria as below.

Select the picklist choice under resource. Set operator to Was Selected and value to {!$GlobalConstant.True} which is a built-in variable. Do this for “Create New Contact” and “Edit Existing Contact” outcomes and rename default to Exit Flow.
Create New Contact
This is a straightforward Create Records element. You will need to select Use separate resources, and literal values. Next, select the Object as Contact and set the fields for AccountId using the recordId, FirstName, LastName, Phone, Email with the variables from the first screen.
Edit Existing Contact
You will need to create another screen element for this with the four fields of First Name, Last Name, Phone, and Email. Set the values of these to the corresponding variables from the record choice set so extFirstName, extLastName, extPhone, and extEmail what this will do is when you go to the screen it will display these existing values for the record you selected.
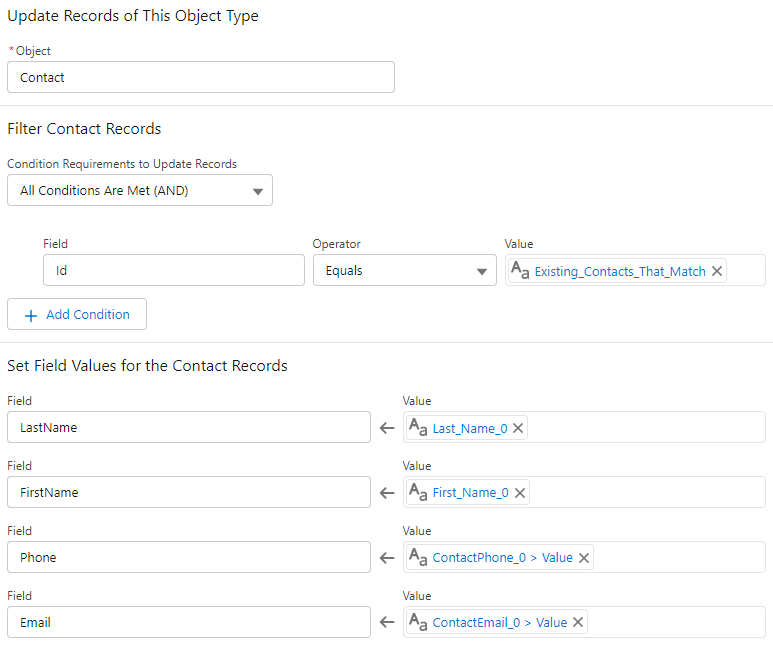
Next, we will create an update records element. Selecting Specify conditions to identify records, and set fields individually. Set object to contact next Filter Contact Recordset to all conditions are met. Select Id Equals {!Existing_Contacts_That_Match} which is the output value from the existing records picklist. Set values of the LastName, FirstName, Phone, and Email to the API names of the fields on the previous screen.
Finish/Start Screen
This is the final part of the flow. Once this is complete you will have a fully working contact creation tool with the previously mentioned matching values. This final screen has a picklist of Yes and No values for Do you want to add another contact with a decision to loop round to the beginning or end of the Flow. This also acts as a screen to confirm that the create element and edit element have been completed.
Once we have finished this the flow should look something like the below.
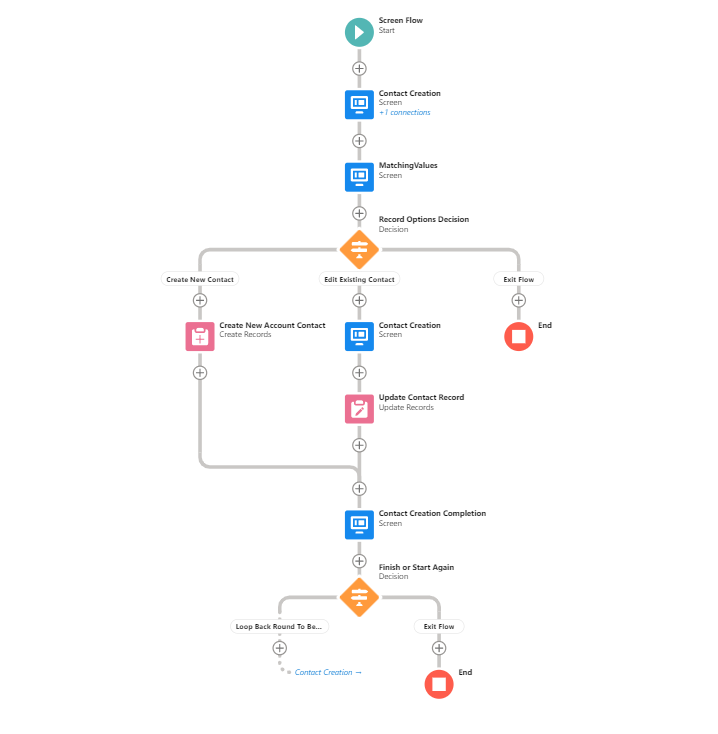
So this will handle the updating of an existing contact and creation of a new contact with the option to run it again at the end in case of creating more contacts.
Taking it to the Next Level
You can include as many fields as you require and really build this out by updating the matching criteria and mapping more variables. You could extend this to and use this as a base for creating referral leads linked back to the referrer and the referring account. One thing you may want to do is have it check every phone number field on contact and position at the company.