Series Links
- Part 1 – Make a Simple Game
- Part 2 – Adding Randomness
- Part 3 – Tweaks And Fixes
- Part 4 – Levelling
- Part 5 – Spells
- Part 6 – Faux AI
- Part 7 – Explorable Map
- Part 8 – Encounter Rates
- Part 9 – Items and Inventory
We have made the Game Flow Battler RPG previously found here, as promised. Though it isn’t stimulating, you will also get the “Game Over” screen at the same point in the game. Today we will change this and going to add some graphics. I have included a video of what we will be able to do at the end of this.
Adding Some Graphics
Import Assets
What kind of game would this be without some graphics? So I have created some assets based on some old pixel characters I created in the past for game jams found here. I have included in the download nine monsters instead of the three. I have also updated the CSV of encounter imports. Which will include some bits for a future tutorial.
Once you have imported the Encounter-Data folder you will now have more encounters to match the assets. What we need to do then is unzip game assets and upload each image individually as a static resource. Call each static resource the same as the name of the image. (We will use this shortly for rendering the monster image).
Now, these are uploaded you need to go to the object manager and select encounter. Add a new formula and set it as text, and this is where we are going to display the image. Use the formula below this will painlessly handle the next part.
IMAGE("/resource/" + Name , "None",128,128)
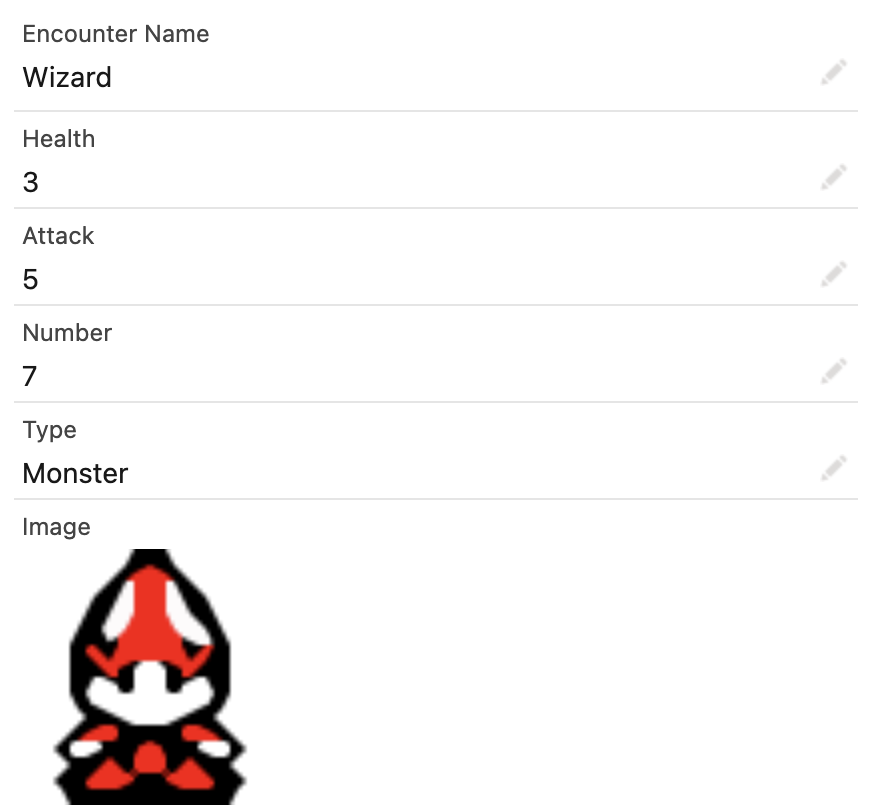
If you add this to the page layout you can now see the image matched with the name. We are setting the size of it to be 128px by 128px you can set this up and down, but it may affect the quality of the image. Check through all the records to make sure they are getting images. They should look like this below.

Updating Graphics In Flows
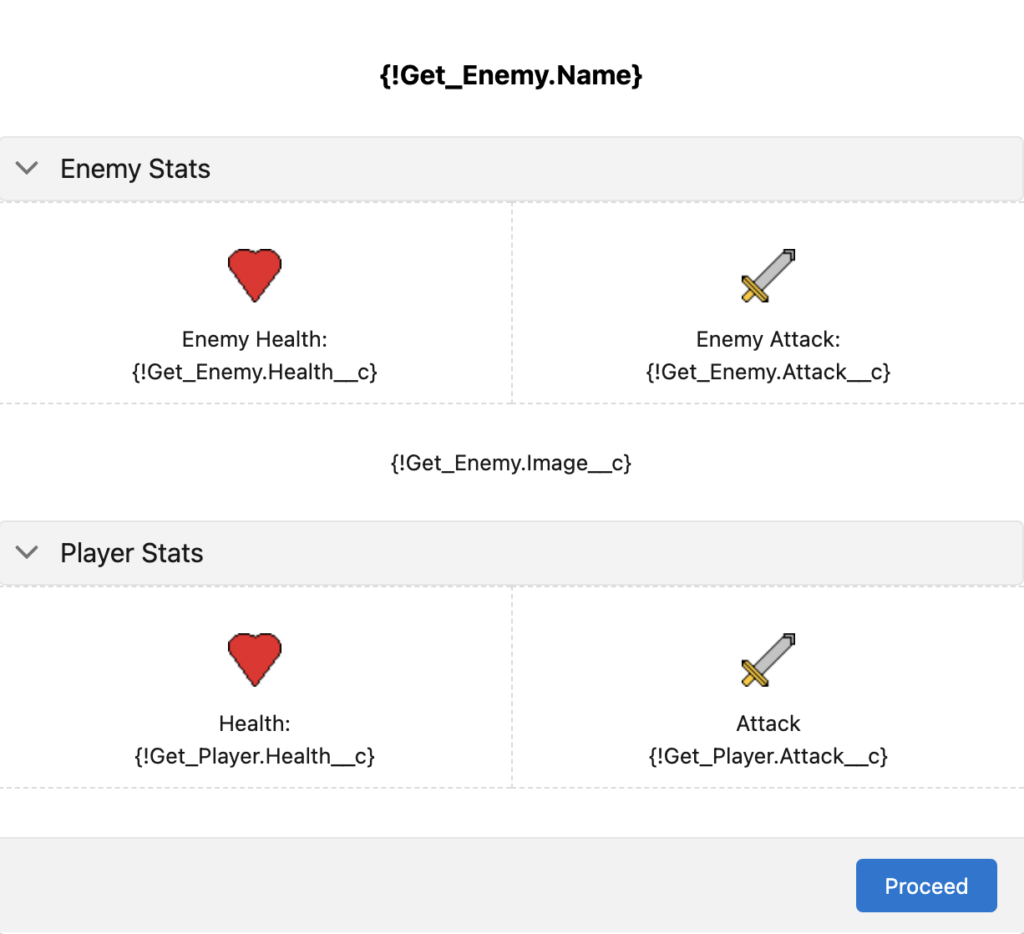
To add the image what you need to do is go to the battle screen and in between the two sections add a display text field. Include the {!Get_Enemy.Image__c} set this to center align. This will now display the image as on the record. I have also added images for the attack and health of a heart and sword to add this click in the relevant text display section and click the image icon and select from the desktop the image. If you have the folder with the enemies in it I have included a heart and sword. (Please note I use an old heart and sword in this example different from the one in the folder).

Adding Randomness To Flow Battler
As you cannot do a random in a field update or a formula in salesforce. We must include some Apex to access the Math.random() function. This will return a value between 0 and 1. So what we are doing is getting the Integer value of this, but before that, we are multiplying it by 10 this changes 0.1 to 1 and 0.2 to 2, and so forth. If you changed this to * 100 this would then change 0.1 to 10, so 0.01 would then be 1.
The apex class we are going to create which I have included below needs to be invocable you may have dealt with invocable apex when using process builders in the past. In Flows, they are visible under the action element if they are invocable.
Battle Calculator Apex Class
global class BattleCalculator {

    @InvocableMethod(label='Invoke Apex')
    public static List<FlowOutputs> invokeThisMetho(List<FlowInputs> request) {
        List<FlowOutputs> results = new List<FlowOutputs>();
        FlowOutputs result = new FlowOutputs();
        result.PlayerRoll = Integer.valueof(Math.random() * 10);
        result.EnemyRoll = Integer.valueof(Math.random() * 10);
        results.add(result);

        return results;
    }

    public class FlowInputs{

        @InvocableVariable
        public Integer PlayerVar;

        @InvocableVariable
        public Integer EnemyVar;

    }

    public class FlowOutputs{

        @InvocableVariable
        public Integer PlayerRoll;

        @InvocableVariable
        public Integer EnemyRoll;
    }

}
What this holds are two dummy values for input which aren’t used. The PlayerRoll and EnemyRoll are the variables we will be putting out. We are using Integer.valueof(Math.random() * 10) which will give us a number between 0 and 9. We are basically rolling a dice depending on the outcome will have an effect on the damage.
We will build a formula further down which will handle this so it will be 0 and 1 are misses so will be 0 damage. 8 and 9 are going to be critical hits, so this will be the base attack with an addition of 2. Everything else in between will be standard damage. We will vary this further in a later tutorial.
Once you have created the apex class. Refresh your flow and go to add action directly after the battle screen. Search for the one which is called BattleCalculator add this and then create two variables for the outputs. PlayerRoll and EnemyRoll are both numbers with no decimal points.
Damage Calculation Fields
As I mentioned previously we need to separate out the PlayerRoll and EnemyRoll into three different values for damage this is going to be done in a formula field and both are almost identical on how they work.
PlayerDamage Formula
IF({!PlayerRoll} < 2, 0,
IF({!PlayerRoll} >  1 && {!PlayerRoll} < 8, {!Get_Player.Attack__c},
{!Get_Player.Attack__c} + 2 ))
EnemyDamage Formula
IF({!EnemyRoll} < 2, 0,
IF({!EnemyRoll} >  1 && {!EnemyRoll} < 8, {!Get_Enemy.Attack__c},
{!Get_Enemy.Attack__c}+2 ))
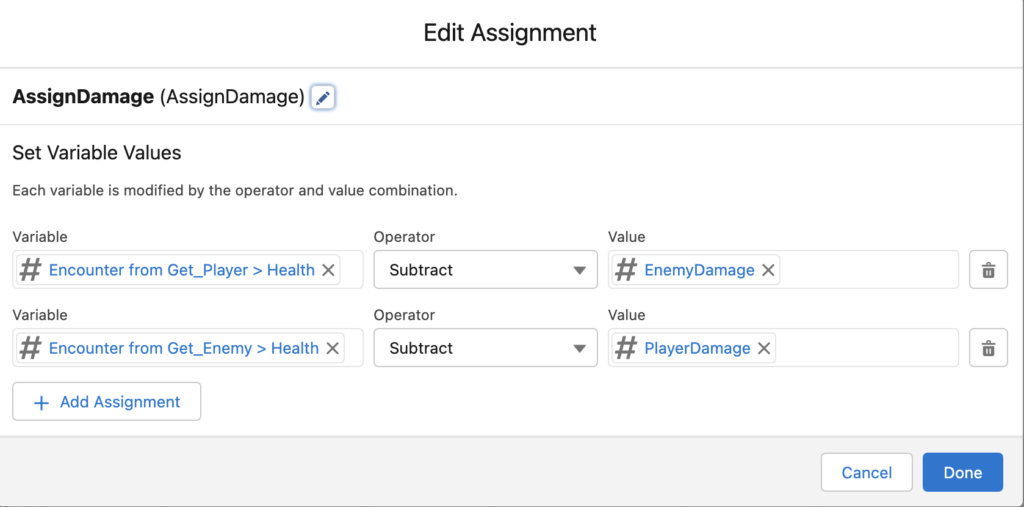
Now we have created these go to the assignment where damage calculation is called AssignDamage. Replace the Get_Player.Attack__c with PlayerDamage and Get_Enemy.Attack__c. It should look like the below screenshot.

Save the flow and run it in debugging a few times and if done currently it will vary the scoring of damage.
Encounter Calculator Apex
Similar to the BattleCalculator we are only using one variable here, and this is to generate the fight you will be facing. From the updated list of monsters.
global class EncounterCalculator {

    @InvocableMethod(label='Invoke Apex')
    public static List<FlowOutputs> invokeThisMetho(List<FlowInputs> request) {
        List<FlowOutputs> results = new List<FlowOutputs>();
        FlowOutputs result = new FlowOutputs();
        result.EncounterRoll = Integer.valueof(Math.random() * 10);
        results.add(result);

        return results;
    }
    public class FlowInputs{
        @InvocableVariable
        public Integer Encounter;
    }

    public class FlowOutputs{

        @InvocableVariable
        public Integer EncounterRoll;

    }

}
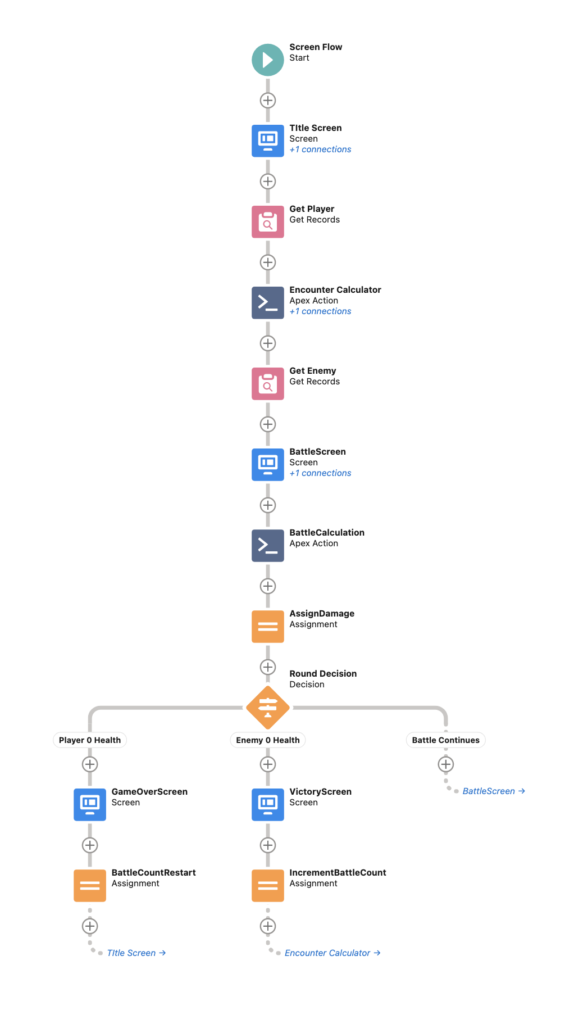
Once you have put this in you will need to add it in the flow before the get_Enemy Element this means you won’t always face the goblin first. Set the output variable to EncounterRoll and then change the assignment in the Get_Enemy to equal the EncounterRoll. Save this and test this in debug to make sure it’s putting out a variable. Now, this has been done the flow should look like the below.

Next Steps
We will add more features in the next tutorial coming shortly. A round outcome screen with who has hit who for what. We will also include another piece of Apex which will decide if it’s a Monster, Item, or Event and add health regeneration.